Implementation of the Tokamak Physics Library
Implementing Tokamak
This section consists of three subsections:
- A general explanation on how to get Tokamak to interact with your OpenGL application.
- The Tokamak objects explained more detailed.
- The two functions that the user needs to implement.
1. How to get Tokamak to interact with OpenGL?
To get Tokamak to work you create a simulator object, which acts as the environment for your physics engine. You then add a "physics version" of each object you are going to draw with OpenGL to this environment. All these objects have attributes, determined by what kind of object it is.
To get the objects to be rendered correctly, you need to use the information the simulator gives you each time you render the OpenGL scene. The applications in this project are made using OpenGL and GLUT and the rendering is done in the function disp(), which is the callback function for glutDisplayFunc().
Each time disp() is called, the simulator must be advanced with the number of seconds that has passed since last time disp() was called. This takes care of the physics calculations and all the physics objects are now updated accordingly, but you still need to get the information from the physics objects and use it when drawing the corresponding OpenGL objects.
You do this by requesting the transformation matrices from the corresponding physics object and multiplying or loading this into your current modelview matrix, depending on the rest of the rendering. After this you draw your object just like you normally do. It is important to take into account that you multiplying or loading the matrix will take you to the position specified in the simulator when you create the physics object. (Done with the method SetPos(), shown in the examples creating objects of classes neAnimatedBody and neRigidBody.)
Below is an example to illustrate the drawing of a ball while utilizing the corresponding physics object's calculated matrix. The code gets the matrix from the physics object, multiplies it and then draws the ball normally with a GLU function.
/*Make a variable to hold the transformation matrix gotten from Tokamak.
  This one is Tokamak-specific and needs to be converted to a normal
  array before OpenGL can use it.*/
neT3 t;

/*Save your current matrix.*/
glPushMatrix();

/*Get the transformation matrix of the corresponding
  physics object: myPhysicsBall*/
t = myPhysicsBall->GetTransform();

/*Put the values from the transformation matrix into a standard array,
  so it can be used by OpenGL.*/
float mat[16] =
    {
	t.rot[0][0], t.rot[0][1], t.rot[0][2], 0.0f,
	t.rot[1][0], t.rot[1][1], t.rot[1][2], 0.0f,
	t.rot[2][0], t.rot[2][1], t.rot[2][2], 0.0f,
	t.pos[0],    t.pos[1],    t.pos[2],    1.0f
    };

/*Multiply the matrix with the current matrix.*/
glMultMatrixf (mat);

/*Draw the sphere with a normal GLU function.*/
gluSphere (q, radius, 20, 20);

/*And finally, pop the current matrix.*/
glPopMatrix();
2. The Tokamak objects
|
This section will discuss and explain the objects needed for basic physics functionality. There are more objects than these in the Tokamak Physics Library, but these are the ones used in almost all implementations. Reference material for the objects explained here, and all other Tokamak objects, are available on the online Tokamak documentation site. neSimulator. The simulator object also contains all the materials used by all the objects in it. The method SetMaterial(index, friction, restitution) allows you to create materials with different friction (how much movement is reduced in a collision) and restitution (how high an object will bounce after collision) values. The default material property used by all objects is friction 0.4 and restitution 0.5. Below is code example of how to create a simulator object. The object neSizeInfo is used in this example, but not explained yet. Just think of it as an object that contains the number of bodies in the simulator. |
|
/*Pointer to a simulator object*/
neSimulator* gSim = NULL;

/*Gravity. Set to -10.0 on the y axis, making objects fall
  downwards on the standard OpenGL x,y,z axis system.*/
neV3 gravity = {0.0, -10.0, 0.0};

/*Creating the simulator. The middle parameter set to NULL
  is for setting a custom memory allocation object of
  the type neAllocatorAbstract. Setting NULL here will tell
  the simulator to use the standard malloc() and free() functions.*/
gSim = neSimulator::CreateSimulator(sizeInfo, NULL, &gravity);

/*Creating a few materials*/
gSim->SetMaterial(0, 0.2, 0.6);
gSim->SetMaterial(1, 0.8, 0.8);
neSizeInfo.
Not much explanation is necessary for the use of this object, as it is used the same way in almost all possible scenarios. Simply put, this object needs to know the number of bodies within the simulator. The formula for this is the same every time.
Below is the code showing how this object is used each time.
/*Tell the object how many rigid bodies we have*/
sizeInfo.rigidBodiesCount = 2;

/*Tell the object how many animated bodies we have*/
sizeInfo.animatedBodiesCount = 6;

/* Tell the object how many bodies we have in total*/
s32 totalBody = sizeInfo.rigidBodiesCount + sizeInfo.animatedBodiesCount;
sizeInfo.geometriesCount = totalBody;

/*The overlapped pairs count defines how many bodies it
  is possible to be in collision
  at a single time. The SDK states this should be calculated as:
  bodies * (bodies-1) / 2
  So we'll take its word for it.*/
sizeInfo.overlappedPairsCount = totalBody * (totalBody - 1) / 2;
neGeometry.
All physics bodies created, regardless of type, need geometry to function correctly. This is where the neGeometry object is used. Each body created calls the AddGeometry() method to give it geometry. This object is then further used to set the objects shape and size with the methods SetBoxSize(width, height, depth), SetSphereDiameter(diameter), and SetCylinder(diameter, height).
The neGeometry object is also used if you want to set the material of the body object. Simple call the method SetMaterialIndex(index). Note that the material index needs to be created first as explained in the neSimulator section.
Examples of how to use neGeometry will be shown in the examples demonstrating how to create the two different body types.
neAnimatedBody.
Physics body object. Objects of this type are not affected by gravity and other external factors except their own placement methods (SetPos() and SetRotation()), but they affect RigidBody objects. Object Examples: floors, walls, and other objects you don't want to fall down or be bumped away by other objects.
Code example of the creation of an animated body, in this case a cube:
/*A variable to store the length, width and height of
  the boxes and one to hold the position*/
neV3 boxSize;
neV3 pos;

/*Create the animated body within the simulator*/
neAnimatedBody* gFloor;
gFloor = gSim->CreateAnimatedBody();

/*Adds geometry to the body*/
geom = gFloor->AddGeometry();

/*Sets the size of the body to be width 20.0, height 2.0
  and depth 20.0 and the shape to be a box*/
boxSize.Set(20.0, 2.0, 20.0);
geom->SetBoxSize(boxSize[0],boxSize[1],boxSize[2]);

/*Sets the material to be of index 0.
  We're assuming that a material with index 0 is created, as shown earlier*/
geom->SetMaterialIndex(0);

/*Updates the bounding info of the object -- must always call this
   after changing a body's geometry.*/
gFloor->UpdateBoundingInfo();

/*Set the position of the floor cube within the simulator
  according to the x,y,z coordinates in OpenGL.
  These are the coordinates of the CENTER of the object.
  Hence, a cube with 20.0 in depth(z) and -10.0 in z pos
  will range from 0.0 z to -20.0 z.*/
pos.Set(0.0, -7.0, -10.0);
gFloor->SetPos(pos);
neRigidBody.
Physics body object. These are affected by gravity and other factors, as well as other animated and rigid objects. They are given mass by the SetMass() method and have the same placement methods as the animated bodies.
Another important method for these objects is SetInertiaTensor().This property is analogous to mass, but affects the rotational behavior. The utility functions neBoxInertiaTensor(), neSphereInertiaTensor() and neCylinderInertiaTensor() should be used to let Tokamak calculate this based on the size and mass of the object, which are the function parameters.
One of the problems with the current version of the Tokamak Physics library becomes apparent when making a rigid body which rolls: Speed reduction because of friction is not implemented. This basically means that a sphere or cylinder will roll forever if it doesn't hit an obstacle. To solve this, use the method SetAngularDamping() which takes a float as a parameter. The movement of the body is then reduces by the amount given each cycle, until it finally stops. This will happen no matter how the body is moving, so a high value here will make the movement look unnatural as the body might stop in mid-air if falling. The value most often used here is 0.01f, not enough reduction to stop a short fall, but enough to eventually stop the object rolling. This is one of the things that will be fixed in the next version of Tokamak.
These objects behave realistically. For example, if one is placed above a solid surface (normally an animated body), it falls down and bounces based on the friction of both the object and the surface. Object Examples: bouncing balls.
Code example of the creation of a rigid body, in this case a ball:
/*Create the rigid body within the simulator*/
neRigidBody* gBall;
gBall = gSim->CreateRigidBody();

/*Adds geometry to the body*/
geom = gBall->AddGeometry();

/*Sets the body to be a sphere,
  and the diameter of that sphere to be 0.8f*/
geom->SetSphereDiameter(0.8f);

/*Sets the material to be of index 1. We're assuming that
  a material with index 1 is created, as shown earlier*/
geom->SetMaterialIndex(1);

/*Updates the bounding info of the object -- must always call this
   after changing a body's geometry.*/
gBall->UpdateBoundingInfo();

/*puts the mass in value, used below*/
GLfloat mass;
mass = 10.0f;

/*Sets the body's mass inertia tensor.
  Since this is a sphere, I use the neSphereInertiaTensor() help function
  and passes the diameter and mass of the object as parameters.*/
gBall->SetInertiaTensor(neSphereInertiaTensor(0.8f, mass));

/*Sets the mass*/
gBall->SetMass(mass);

/*Sets the angular damping, as explained above*/
gBall->SetAngularDamping(0.01f);

/*Set the position of the ball within the simulator
  according to the x,y,z coordinates in OpenGL.
These are the coordinates of the center of the object.*/
pos.Set(0.0, -1.6, -15.0);
gBall->SetPos(pos);
Picture example
To clarify the use of all Tokamak objects used, I will show a screenshot of an application, and describe shortly the types of object it contains.

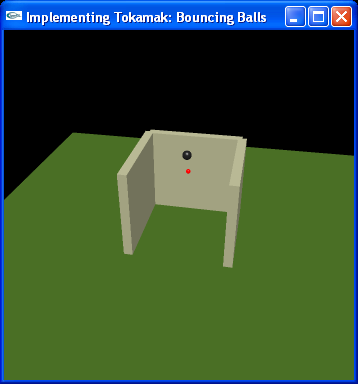
The neSimulator Object is the whole picture, every object within the picture is contained within the simulator. Every animated and rigid body have a defined neGeometry object when created.
Strictly speaking, the three walls could have been defined as rigid bodies instead, since the floor is an animated body and therefore would support the walls. However, if the mass value of the walls were low, the balls might push them over when colliding.
3. Needed functions: InitPhysics() and KillPhysics()
The only functions that need to be created to implement Tokamak are:
- One for initializing of the physics.
- One to destroy the physics.
InitPhysics()
This function must contain the creation of the simulator, sizeinfo and all the animated and rigid bodies with their respective geometries. All the code shown in the examples belonging to the objects in subsection 2 should go into InitPhysics(), in the following order:
First the sizeinfo is set, then the Simulator is created. Finally, all the animated and rigid bodies are created. No example will be given here, since most of the code is given above, and the complete source code for three projects with Tokamak implemented is presented along with this article.
KillPhysics()
A short and simple function that should be called before exiting the application. It checks to see if there exists a simulator object, and if so destroys it.
Code example. Used the simulator pointer gSim used in subsection 2.
void KillPhysics(void)
{
  if (gSim)
  {
     neSimulator::DestroySimulator(gSim);
     gSim = NULL;
  }
}
Conclusion
In applications where realistic physics is wanted, the use of Tokamak Physics Library version 1.2 is generally a good idea. It will greatly reduce the development time for most developers not strong in physics and mathematics, and still deliver overall realistic object interaction. Some bugs remain however, and for applications where the main goal is to simulate real life physics in one of the areas where Tokamak still needs improvement, using other components or developing the physics yourself is a better idea. A greatly improved version of Tokamak, version 2, is scheduled for release sometime in 2004, and will probably fix most of these issues.
Applications developed with Tokamak
I have developed three applications to demonstrate some of the possibilites when using Tokamak. None of these are excellent in any way, but they are not meant to be either. They simply show how the implementation of the Tokamak Physics Library behaves in situations where the alternative would be to personally implement physics formulas, which would also have slowed down the development considerably.
All the applications are available in two versions: without textures, and with textures. The texture version requires a more powerful graphics card to run smooth, therefore I created a version without textures so the applications could be used on computers without good graphics cards as well. The screenshots shown are without and with textures respectively.
Se references for access to executables and sourcecode.
Each application section below will contain the following: title, screenschots, description of the application, and instructions on how to interact with it.
Some instructions are shared by each program, and therefore given here for simplicity. These are keys which lets the user rotate the scene and move the viewpoint on each axis. Below is a list over each key and its corresponding action.
| 1 | Rotates the x axis with a negative value. |
| 2 | Rotates the x axis with a positive value. |
| 3 | Rotates the y axis with a negative value. |
| 4 | Rotates the y axis with a positive value. |
| 5 | Moves the scene to the right (negative value on the x axis). |
| 6 | Moves the scene to the left (positive value on the x axis). |
| 7 | Moves the scene upwards (positive value on the y axis). |
| 8 | Moves the scene downwards (negative value on the y axis). |
| 9 | Moves the scene towards you (positive value on the z axis). |
| 0 | Moves the scene away from you (negative value on the z axis). |
| q | Quits the program. |
Bouncing Balls
Description
A basic demonstration of rigid bodies falling and bouncing on animated bodies. Two balls(rigid bodies) with different mass and size start suspended in the air with no gravity. When gravity is enabled, they start to fall. As one is beneath the other, you can clearly see that the rigid bodies affect each other as well, as they land and the bottom ball is giving more velocity by the larger, top ball colliding with it. The larger ball can also be given "pushes" in different directions by the user.
Instructions
There are keys for applying a push to the large ball in different directions, and keys to reset the scene and initiate gravity.
| w | Gives the ball a push (impulse) away from you (negative z value). |
| x | Gives the ball a push (impulse) towards you (positive z value). |
| s | Gives the ball a push (impulse) downwards (negative y value). |
| a | Gives the ball a push (impulse) to the left (negative x value). |
| d | Gives the ball a push (impulse) to the right (positive x value). |
| i | Resets the scene and physics engine, sets gravity to zero. |
| Left mouse button | Sets normal gravity. |
| Right mouse button | Sets gravity to zero, thereby creating a weightless enviroment. Note that if the balls allready have movement, they will not stop because of this. Use the i button for resetting the simulation instead. |
Billiard
Description
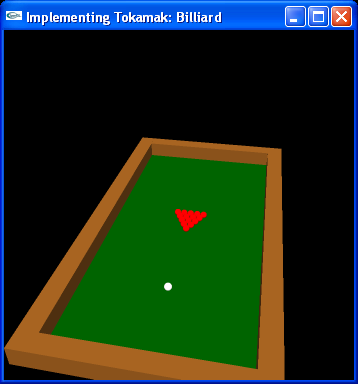
Basic billiard, without holes and a visible billiard stick. The white ball is moved by applying a push to it in the direction(s) wanted, thereby simulating the billiard stick. This demo demonstrates collision detection much better than the previous one, and it's easier to see if the balls behave realistically as most people have seen real billiard being played.
Instructions
Use the w,s,a,d keys to "shoot" the white ball around. It is possible to hold down more than one button, and therefore to shoot all directions in 360 degrees by different combinations. The longer you hold, the more force is used to push the ball. When you release one of the buttons, the push will be applied. For example, to get the white ball to shoot towards the other balls, but a little to the right as well, hold down the w button and then after a while, hold down the d button for a little while as well. When either of those are released, the ball will shoot towards the other balls and, depending on how long you held the d button, will head slightly to the right as well.
| w | Gives the ball a push (impulse) away from you (negative z value). |
| s | Gives the ball a push (impulse) downwards (negative y value). |
| a | Gives the ball a push (impulse) to the left (negative x value). |
| d | Gives the ball a push (impulse) to the right (positive x value). |
| i | Resets the scene and physics engine. |
Labyrinth
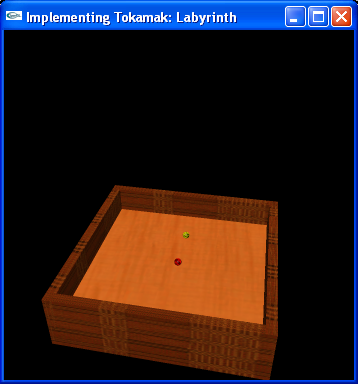
Description
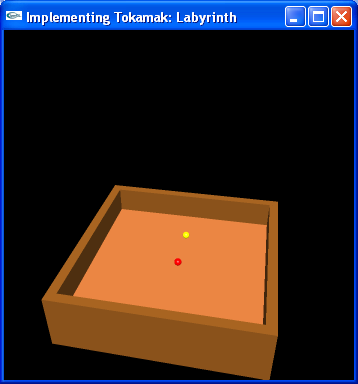
Labyrinth, although withouth the hole and walls on the board. Basically, this is a demo that lets you tilt the floor so that the balls roll around. This application demonstrates something none of the two others do: Moving an animated body (the floor in this case) to create movement in the rigid bodies on it. There are some bugs in the Tokamak Physics Library that become apparent here: the rigid bodies are not completely realistically affected by a moving animated body. Therefore this demonstration also shows some of the limits of the current version of Tokamak.
Instructions
Simply hold down one or more of the w,s,a,d keys to tilt the floor, and the balls will behave somewhat realistically.
| w | Tilts the floor away from you. |
| s | Tilts the floor towards you. |
| a | Tilts the floor to the left. |
| d | Tilts the floor to the right. |
| i | Resets the scene and physics engine. |

