


Textures
We must be able to:
- extract parts of a bitmap and put it on a surface.
- stretch or shrink a bitmap to fit a surface.
- repeat a bitmap on a surface.
- put a bitmap on a surface that is not flat.
- load, from file, a reasonable number of bitmap formats
We will deal with these problems in this module.
Texture
Using textures in OpenGL is according to Mark Kilgaard [2] an operation in 4 steps:
- Turn on (enable) textures
glEnable(GL_TEXTURE_2D); - Specify the texture
glTexImage2D(...); - Specify how the texture should be placed on a surface
glTexEnvi(...); - Draw by specifying coordinates on the surface and coordinates of the texture
      glBegin(GL_TRIANGLES);
        glTexCoord(...); glVertex3f(..)
        glTexCoord(...); glVertex3f(..)
        glTexCoord(...); glVertex3f(..)
      glEnd();
Specification of textures
There are a lot of methods and parameters in OpenGL to control textures on different forms, and there are a lot of possibilities for combining the material of a surface with textures. The ambitions here is not to give a full description of this options. We will concentrate on the basics. Full control over textures and visual effects is theme for trial and error based on the OpenGL documentation.
Turning on textures, glEnable(), and generating textures, glTexImage2D(), is fairly simple to understand from the OpenGL documentation.
We will look a little closer on how textures are placed on a surface. Again, we will only concentrate on basics. The possibilities are mush more numerous than shown below.
Important methods are:
  glTexParameteri(GL_TEXTURE_2D,...,...);
  glTexEnvi(GL_TEXTURE_ENV,...,...);
glTexParameter
There are in particular two properties we can control by glTexParameteri():
-
We can decide whether the texture should be locked to the geometry of the surface (clamp) or whether it should be repeated over the surface (repeat).
glTexParameteri(GL_TEXTURE_2D,GL_TEXTURE_WRAP_S,GL_REPEAT)
glTexParameteri(GL_TEXTURE_2D,GL_TEXTURE_WRAP_S,GL_CLAMP)
Note that GL_TEXTURE_WRAP_S is on of two directions in a 2D texture. The alternative is GL_TEXTURE_WRAP_T.
-
We can decide how a pixel should be rendered if a texture element covers less than or more than a pixel.
glTexParameteri(GL_TEXTURE_2D,GL_TEXTURE_MAG_FILTER,GL_NEAREST)
glTexParameteri(GL_TEXTURE_2D,GL_TEXTURE_MIN_FILTER,GL_NEAREST)
where an alternative to GL_NEAREST is GL_LINEAR. Note also that glTexParameter gives us a possibility to decide which mipmap we want to use. Mipmaps are alternative textures which offers more or less details, typically base on distance.
glTexEnv
glTexEnvi() lets us control how the texture should relate to the material of the surface it is placed on.
glTexEnvi(GL_TEXTURE_ENV,GL_TEXTURE_ENV_MODE,GL_DECAL)
will put the texture on the surface without bothering about the material of the surface.
Alternatives:
glTexEnvi(GL_TEXTURE_ENV,GL_TEXTURE_ENV_MODE,GL_MODULATE)
glTexEnvi(GL_TEXTURE_ENV,GL_TEXTURE_ENV_MODE,GL_BLEND)
has effects that are described in detail in the OpenGL documentation.
Geometry
Let us first look at some simple mechanisms to control the placing of a texture on a rectangle:

Note that when we always assumes that a bitmap has size 1 in both directions, this has nothing to do with the physical size in pixels or image elements. The actual bitmap in this case is 64 x 64 pixels. The size of the rectangle we want to place the bitmap (texture) on is up to us, or the geometry of our model.
Note that OpenGL only accepts bitmaps with sizes 2n x 2m. n may be different from m.
Let us focus on the geometry and put a texture on some rectangles.

- Image 1 is rendered like this:
glTexParameteri(GL_TEXTURE_2D,GL_TEXTURE_WRAP_S,GL_CLAMP);
glTexParameteri(GL_TEXTURE_2D,GL_TEXTURE_WRAP_T,GL_CLAMP);
....

glTexImage2D(..);
glBegin(GL_POLYGON);
  glTexCoord2f(0.0f,0.0f);
  glVertex3f(-6.5f,-6.5f,0.1f);

  glTexCoord2f(1.0f,0.0f);
  glVertex3f(6.5f,-6.5f,0.1f);

  glTexCoord2f(1.0f,1.0f);
  glVertex3f(6.5f,6.5f,0.1f);

  glTexCoord2f(0.0f,1.0f);
  glVertex3f(-6.5f,6.5f,0.1f);
glEnd();
- Image 2 is rendered like this:
glTexParameteri(GL_TEXTURE_2D,GL_TEXTURE_WRAP_S,GL_CLAMP);
glTexParameteri(GL_TEXTURE_2D,GL_TEXTURE_WRAP_T,GL_REPEAT);
....

glTexImage2D(..);
glBegin(GL_POLYGON);
  glTexCoord2f(0.0f,0.0f);
  glVertex3f(-6.5f,-6.5f,0.1f);

  glTexCoord2f(3.0f,0.0f);
  glVertex3f(6.5f,-6.5f,0.1f);

  glTexCoord2f(3.0f,3.0f);
  glVertex3f(6.5f,6.5f,0.1f);

  glTexCoord2f(0.0f,3.0f);
  glVertex3f(-6.5f,6.5f,0.1f);
glEnd();
- The only difference between image 2 and image 3 is
the first line:
glTexParameteri(GL_TEXTURE_2D,GL_TEXTURE_WRAP_S,GL_REPEAT);
  ...
- In image 4 the first two lines are:
glTexParameteri(GL_TEXTURE_2D,GL_TEXTURE_WRAP_S,GL_CLAMP);
glTexParameteri(GL_TEXTURE_2D,GL_TEXTURE_WRAP_T,GL_CLAMP);
  ....
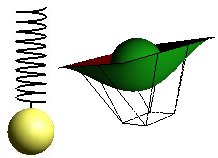
We see that we can connect corners in the geometry, glVertex3f(), with coordinates in the texture, glTexCoord2f(). This is simple and make perfect sense when have control over all corners. We can easily imagine that this is getting more complicated when we want to put textures on, say a Bezier surface.
There is, not surprisingly, a solution to this which is based on a mapping of the texture parallel to the mapping of the geometry. The code below puts a texture on a Bezier surface:

...
// define ctrlpoints for beziersuface
GLfloat ctrlpoints[4][4][3] = // [v][u][xyz]
{
...
};
...
glTexEnvi(GL_TEXTURE_ENV,GL_TEXTURE_ENV_MODE,GL_DECAL);

glTexParameteri(GL_TEXTURE_2D,GL_TEXTURE_MIN_FILTER,GL_NEAREST);
glTexParameteri(GL_TEXTURE_2D,GL_TEXTURE_MAG_FILTER,GL_NEAREST);
glTexParameteri(GL_TEXTURE_2D,GL_TEXTURE_WRAP_S,GL_REPEAT);
glTexParameteri(GL_TEXTURE_2D,GL_TEXTURE_WRAP_T,GL_REPEAT);

glEnable(GL_TEXTURE_2D);
glEnable(GL_MAP2_VERTEX_3);
glEnable(GL_MAP2_TEXTURE_COORD_1);
glEnable(GL_MAP2_TEXTURE_COORD_2);

glTexImage2D(GL_TEXTURE_2D,0,3,
            m_theImage.GetWidth(),
            m_theImage.GetHeight(),
            0,GL_RGB,GL_UNSIGNED_BYTE,
            m_theImage.GetBitsPtr());

// map geometri
glMap2f(GL_MAP2_VERTEX_3,
        0.0f,1.0f,3,4,0.0f,1.0f,12,4,
        & ctrlpoints[0][0][0]);

// map texture
GLfloat txpts[2][2][2]={{{0.0, 0.0}, {1.0, 0.0}},
                       {{0.0, 1.0}, {1.0, 1.0}}};
glMap2f(GL_MAP2_TEXTURE_COORD_2,0,1,2,2,0,1,4,2,
        & txpts[0][0][0]);

glMapGrid2f(20,0.0f,1.0f,20,0.0f, 1.0f);

glEvalMesh2(GL_FILL, 0, 20, 0, 20);
